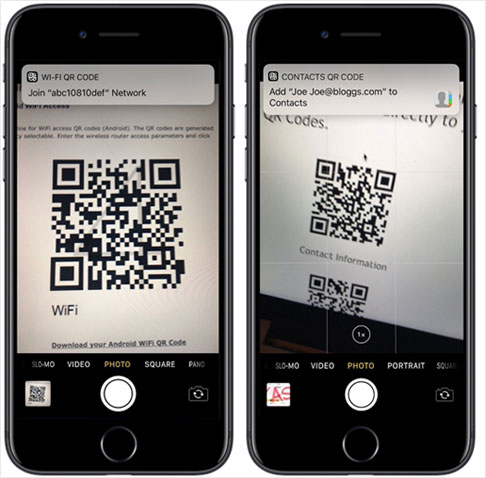
Scan QR Code with iPhone Camera
1. Open the Camera app
2. Point camera at the QR code. A second later, a notification preview will drop
down from the top of the screen
3. Tap on the notification to open the webpage.
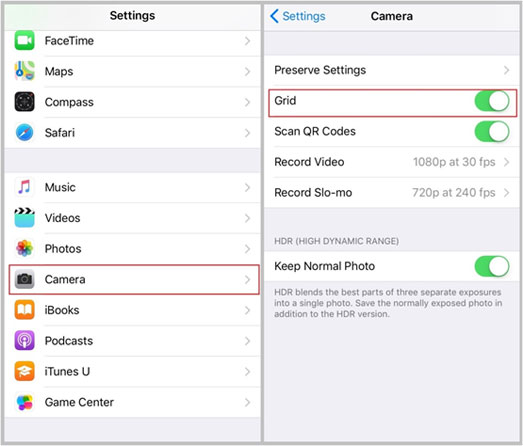
Enable Camera Grid Lines
The grid lines can help photographers line up a shot, follow the Rule of Thirds, and get the correct
horizontal and vertical balance.
1. Launch Settings app from home screen of you iPhone
2. Scroll down to Camera, and tap on it
3.
Switch on the “Grid” option to turn on grid lines in Camera.
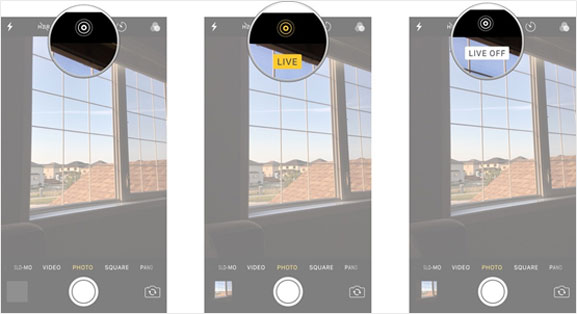
Live Photos
Take a Live Photo
Live Photo feature is only available on iPhone 6S and later devices.
1. Open the Camera app
2. Tap the Live Photo button at the top center of the screen
3. Hold your
iPhone still
4. Tap shutter button to take a Live Photo
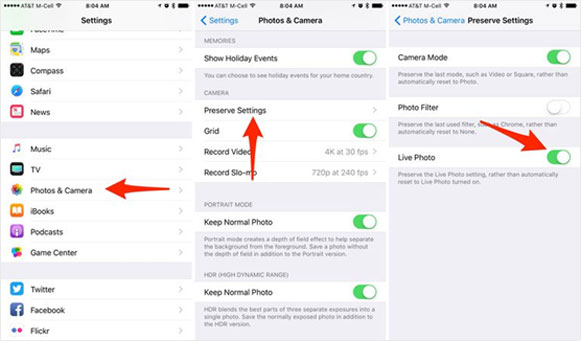
Disable Live Photo Feature on iPhone
If you want to take a still image instead, you can change your camera settings to turn off Live Photos.
1. Go to Settings > Camera
2. Tap to turn off Live Photos. You can preserve your Camera settings so that
Live Photos is always on or off. Go to Settings > Camera > Preserve Settings.
View Live Photos on iPhone
1. Open the Photos app
2. Go to the Photos tab
3. Tap the Live Photo, and firmly press the screen
and hold
Edit and Make a New Key Photo
1. Launch Photos app
2. Find the Live Photo you want to edit.
3. Tap “Edit” at the top right corner
of the screen. At the bottom of the screen, move the slider to change the frame.
4. Then tap “Make Key
Photo”.
5. Tap “Done”.

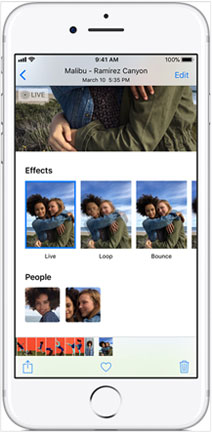
Add Live Photo Effects
1. Open the Live Photo you want to edit
2. Swipe up the screen until you see Effects
Here you'll find three new Live Photo effects. Choose Loop, Bounce, or Long Exposure.
Loop: Turn a Live Photo you love into a video loop. Choose an image yourself, or let Photos suggest which
ones would make great loops.
Bounce: Make your Live Photo rock back and forth. Watch your Live Photo as it happened, then instantly play
in reverse.
Long Exposure: Capture the elements of time and movement. Create a beautiful effect that used to be possible
only with a DSLR camera. Fireworks become bright streaks across the night sky. A waterfall, a magical
blur.
GIFs animate in iOS 11 Photos
Turn iPhone Live Photos into Gifs
1. Select the Live Photos album
2. Tap the picture that you would like to make a GIF.
Once you’ve opened up the picture, swipe up from the bottom of the screen for the app to give you four
animation options, which are Live, Loop, Bounce, and Long Exposure.
Once you’ve chosen the desired
effect, the photo will appear in a new album called “Animated Album.”
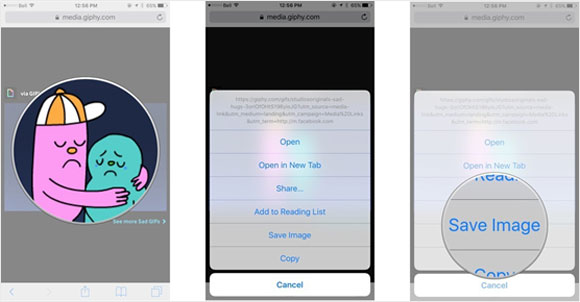
Save Gifs from Internet
1. Find the GIF you would like to save (giphy.com is a great place to start!)
2. Tap and hold the GIF
until a new window appears on screen
3. Tap Save Image
View GIFs on iPhone in iOS 11
1. Launch Photos app on your iPhone/iPad
2. Go to Albums on the bottom right corner of your phone screen
3. Choose Animated album to view your GIFs
Import, Export and Manage Photos
Import Photos from Computer to iPhone via IOTransfer
1. Free download IOTransfer, install and run the application
2. Connect your iPhone to computer via USB
cable, and run IOTransfer
3. Go to MANAGE > Photos > Import, and then you can transfer photos from
computer to your iPhone

Export Photos from iPhone to Computer via IOTransfer
1. Free download IOTransfer, install and run the application
2. Connect your iPhone to computer via USB
cable, and run IOTransfer
3. Go to MANAGE > Photos > Export to transfer photos from iPhone to PC

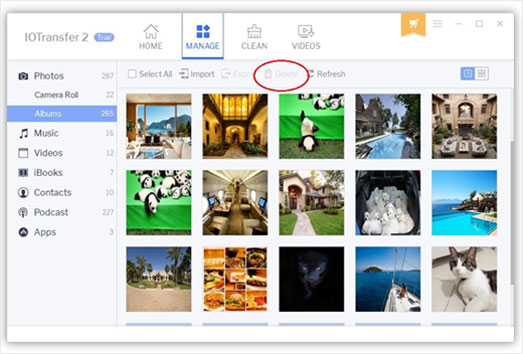
Bulk Delete iPhone Photos via IOTransfer
1. Connect iPhone to computer via USB cable, and run IOTransfer
2. Go to MANAGE > Photos > Select All >
Delete
Screenshot on iPhone
Take a Screenshot on iPhone
1. Press and hold your device's Top or Side button
2. Immediately click the Home button, and then
release the Top or Side button. In iOS 11, a thumbnail of yourscreenshot appears in the lower-left corner of
your device.
3. Tap the thumbnail to add drawings and text with Markup

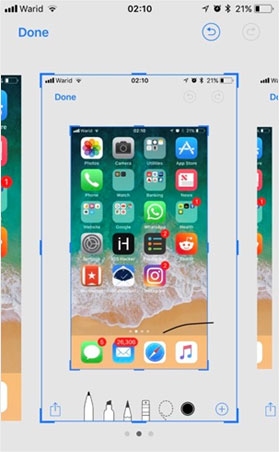
Edit a Screenshot and Edit Multiple Screenshots
1. Tap the screenshot preview in the lower left corner of your screen to open up the Instant Markup interface
2. Use a finger to adjust the blue outline if you want to crop your image There are all kinds of tools
in Instant
Markup, including a pen, pencil, highlighter, eraser, drop shadow tool, crop, multiple pen colors, and
undo/redo.
3. Choose a pen/marker/pencil and a color and then draw with a finger or the Apple Pencil
(on iPad Pro) to
edit your screenshot

*If you take multiple screenshots at once, they'll all be displayed in Instant Markup and you can swipe
between them.